PicGo Image Upload Plugin Development — Using imgloc Image Hosting as an Example


1. Preface
Recently, I began working on my own blog platform. Since blog content is heavily regulated in China, I opted to host my blog on a server overseas. Most blog platforms tend to bombard users with an ever-increasing number of ads, often to an unbearable extent.
Writing a blog inevitably involves adding images, so I spent a fair amount of time searching for a stable foreign image hosting service that’s accessible from China and, hopefully, sustainable in the long run. I ultimately chose imgloc.com. I’m not sure how it will hold up in the future, but for now, it’s my pick.
I came across recommendations online to use PicGo as an image upload tool. It allows you to get a link immediately after uploading an image, sparing you the hassle of visiting the image hosting site every time—a real time-saver. After some research, I noticed there wasn’t an upload plugin for imgloc.com. So, I decided to seize the opportunity and develop a PicGo upload plugin for imgloc myself.
2.About PicGo
PicGo is a typical Electron application and an excellent open-source project led by Chinese developers. It offers client versions for multiple platforms, including Windows, Mac, and Linux, making it both practical and convenient.
Before starting development, it’s a good idea to thoroughly study the PicGo Plugin Development Guide Understand the core architecture and main processes of PicGo.
PicGo Upload Process:

Based on the PicGo documentation and the diagram above, we can develop these 5 modules:
-
Transformer
-
Uploader
-
beforeTransformPlugins
-
beforeUploadPlugins
-
afterUploadPlugins
-
Our task is to upload an image to imgloc.com and then directly paste the image’s Markdown-format URL into a Markdown editor. We need to develop the Uploader module according to the upload API of imgloc.com.
-
A PicGo plugin is essentially an npm package, so before starting development, please ensure that you have a local Node.js development environment set up.
3.Plugin directory structure
-
The name of a plugin in PicGo must follow the format of
picgo-plugin-xxx, otherwise, it cannot be installed. So we set the name of our plugin as:picgo-plugin-imgloccom -
PicGo installs plugins by pulling npm packages, so please register an account on the official npm website. This will be used to publish our plugin package. Registration address:https://www.npmjs.com/
-
Select or create a folder to serve as the plugin directory. The structure is fairly simple, requiring only the essential
package.jsonfile for a npm package and the entry fileindex.js:
|--READ.ME
|--index.js
|--package.json
|--logo.png
4.npm init
Use npm init to initialize the directory, primarily to
fill in the basic information for the plugin.
5.Register the Plugin
PicGo calls the handle method exposed by the plugin, while passing the ctx (PicGo's context object) to the handle method. This context object contains the APIs provided by PicGo.
Define a register method that uses the registration method from ctx to register an uploader plugin with PicGo. Bind the handle method and define a name. When PicGo invokes this plugin, it will call the associated handle method.
//Register a plugin and expose it to PicGo, ctx will be passed in
module.exports = (ctx) => {
    const register = () => {
        //register id is imglcocom
        ctx.helper.uploader.register('imgloccom', {
            config: config,                    //configuration
            handle: imglocUploadhandle,        //binded handler
            name: 'Imgloc.com PicGo Uploader', //plugin name
        });
    };

    //exposed to be invoked
    return {
        uploader: 'imgloccom',
        register
    };
};
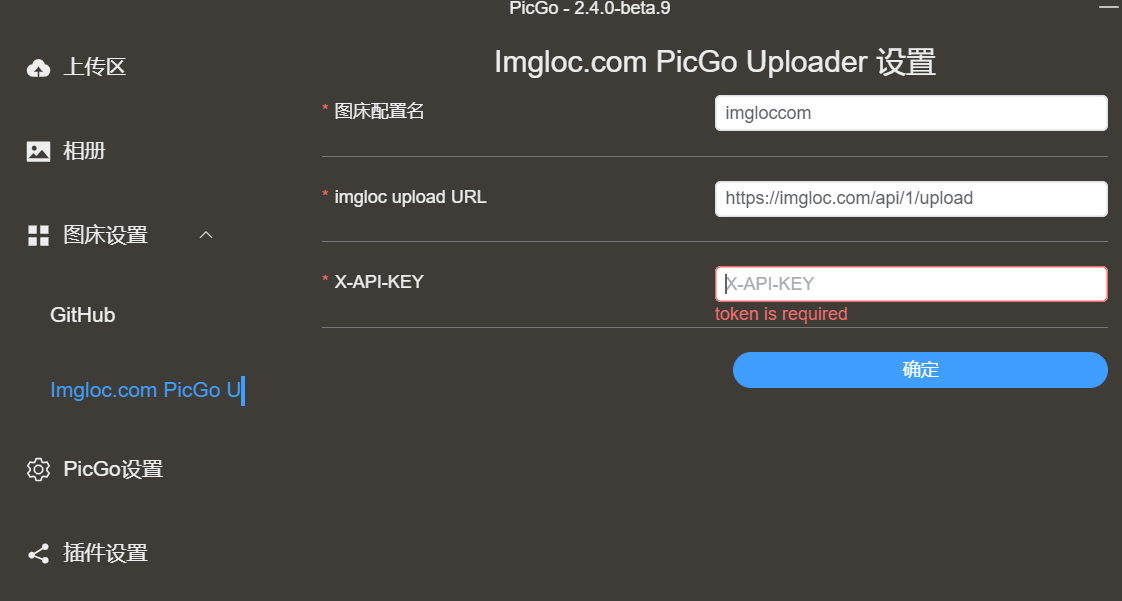
6.Plugin Configuration
/**
 * imgloccom's configuration. PicGo automatically generates
 * a configuration fill UI based on this config array
 * we should get a user's imgloccom X-API-KEY
 */
const config = () => {
    return [
        {
            name: 'url',
            type: 'input',
            default: 'https://imgloc.com/api/1/upload',
            required: true,
            message: 'imgloc.com API',
            alias: 'imgloc upload URL'
        },
        {
            name: 'token',
            type: 'input',
            default: '',
            required: true,
            message: 'X-API-KEY',
            alias: 'X-API-KEY'
        }
    ];
};
PicGo automatically generates an interface for the user to set
the relevant parameters based on the above configuration:
7.Post request
The post request parameters must be constructed before uploading an image.
/**
 * API request parameters for imgloc.com
 * formData references many other plugins and this one works.
 */
const postOptions = (API_url, X_API_KEY, fileName, image) => {
    return {
        method: 'POST',
        url: API_url,
        headers: {
            'X-API-KEY': X_API_KEY,
            'Content-Type': 'multipart/form-data',
            'Accept': 'application/json'
        },
        //Form data, image file
        formData: {
            filename: fileName,
            source: {
                value: image,
                options: {
                    filename: fileName,
                    source: fileName
                }
            }
        }
    };
};
8.handle Implementation
imglocUploadhandle is the main handler of this plugin. The upload request is constructed based on the X-API-KEY set by the user, the image buffer obtained, and other parameters, and then take the http request.
Parses the result of the call and returns url of the uploaded image.
//main code of handler, use async mode to http requests for not blocking.
const imglocUploadhandle = async (ctx) => {
    const userConfig = ctx.getConfig('picBed.imgloccom');

    //The ctx.log.warn method records information in a log file
    // as a means of debugging here
    // logs can be found in
    // C:\Users\UserName\AppData\Roaming\picgo\picgo.log
    // AppData is a hidden dir
    //reopen PicGo to effect a modify in src
    ctx.log.warn(userConfig);

    //whether the parameters configured
    if (!userConfig) {
        /* I was trying to pop up an alert to inform the user,
        but the call doesn't seem to be working.
        Maybe the alert switch isn't turned on?
        ctx.emit('notification', {
            title: 'Please configure Imgloc first!',
            body: body.status_txt
        });
         */
        throw new Error("Please configure Imgloc first!");
    }

    const {url, token} = userConfig;
    if (!token) {
        throw new Error("Please configure Imgloc first!");
    }

    const imgList = ctx.output;
    //Get the image buffer to be uploaded
    if (!imgList || !Array.isArray(imgList) || imgList.length === 0) {
        ctx.log.warn('No images to upload');
        return ctx;
    }

    for (const img of imgList) {
        //Upload each image, get url of the uploaded image
        //ctx.log.warn(img) print to see the specific fields
        let imageBuffer = img.buffer
        if (!imageBuffer && img.base64Image) {
            imageBuffer = Buffer.from(img.base64Image, 'base64')
        }
        //ctx.log.warn(image)
        if (!imageBuffer) {
            throw new Error("Can't load the picture.");
        }
        //post request parameter
        const postConfig = postOptions(url, token, img.fileName, imageBuffer);
        //ctx.log.warn(postConfig);

        //Call the API to upload images
        const response = await ctx.request(postConfig);

        const body = JSON.parse(response);
        //ctx.log.error(body);

        //Upload results processing
        if (body.status_code === 200) {
            delete img.base64Image;
            delete img.buffer;
            //set the true url uploaded
            img.imgUrl = body.image.url;
        } else {
            throw new Error(body.status_txt);
        }
    }

    return ctx;
};
OK, now we have basically finished the plugin.
9.Local Test
In ‘Plugins Settings’, click on the right arrow to import the local development directory as a plugin and test the upload result.

If it doesn't work, you'll have to step through the debugging process.
Use the ctx.log.warn, success, error methods.
Print a message in index.js to debug, the log file may at
C:\Users\Username\AppData\Roaming\picgo\picgo.log
Note that AppData is hidden.
Every time the code modified, you must exit PicGo and reopen it or restart it by right clicking in the tray window.
After testing it correctly, you can publish the plugin to the npm repository, or of course keep it for your own use.
10.Update packjage.json
{
  "name": "picgo-plugin-imgloccom",
  "version": "1.0.4",
  "description": "PicGo plugin for imgloc.com",
  "main": "index.js",
  "homepage": "https://github.com/jingxing05/picgo-plugin-imgloccom.git",
  "scripts": {
    "test": "echo \"Error: no test specified\" && exit 1"
  },
  "keywords": [
    "imgloc",
    "nodejs",
    "electron",
    "picgo",
    "picgo-gui-plugin",
    "picgo-plugin"
  ],
  "author": "qingfengzeng, zenge, jingxing05",
  "license": "Apache 2.0"
}
keywords add picgo-gui-plugin means it is a gui plugin.
'CLI' is not displayed in the upper right corner when searching for plugins.
Generate a nice looking logo.png image for the plugin using the AI image generator tool and place it in the project root directory.
PicGo can automatically read it as the plugin logo when pulling from npm.
11.npm Publish
- Execute the login operation
npm loginin the plugin directory in a Dos or PowerShell window and press Enter to log in. - After successfully logging in, continue with
npm publishto publish.
12. Installation
Search imgloccom in PicGo's Plugins Settings,
and the published plugin will appear. Just install it to use.
13. Github code
Github Code is here : picgo-plugin-imgloccom